Fundamentals
This section describes fundamental Creo TOOLKIT concepts and functions.
Introduction to Creo Toolkit
Creo TOOLKIT is the customization toolkit for Creo Parametric from Parametric Technology Corporation (PTC). It gives customers and third-parties the ability to expand Creo Parametric capabilities by writing C programming language code and then seamlessly integrating the resulting application into Creo Parametric.
Creo TOOLKIT provides a large library of C functions to provide the external application safe and controlled access to the Creo Parametric database and applications. Creo TOOLKIT is the primary PTC application programmer's interface (API) for Creo Parametric.
Online Documentation in Creo Toolkit APIWizard
Creo TOOLKIT provides an online browser called the APIWizard that displays detailed documentation data. This browser displays information from the Creo TOOLKIT Users’ Guide and API specifications derived from Creo TOOLKIT header file data.
The Creo TOOLKIT APIWizard contains the following:
•  Definitions of Creo TOOLKIT objects and their hierarchical relationships
•  Definitions of Creo TOOLKIT functions
•  Declarations of data types used by Creo TOOLKIT functions
•  The Creo TOOLKIT Users’ Guide, which users can browse by topic or by object
•  Code examples for Creo TOOLKIT functions (taken from applications provided as part of the Creo TOOLKIT installation)
Review the Release Notes for the most up-to-date information on documentation changes.
Note
•  The User’s Guide is also available in PDF format. This file is located at:<creo_toolkit_loadpoint>\tkuse.pdf
•  From Creo Parametric 4.0 F000, the applet based APIWizard is no longer supported. Use the non-applet based APIWizard instead.
To Install the APIWizard
The Creo Parametric product CD installation procedure automatically installs the Creo TOOLKIT APIWizard. The files reside in a directory under the Creo Parametric load point. The location for the Creo TOOLKIT APIWizard files is <creo_toolkit_loadpoint>\protkdoc
To load the APIWizard manually, copy all files from <creo_toolkit_loadpoint>\protkdoc to your target directory.
APIWizard Overview
The APIWizard supports Internet Explorer, Firefox, and Chromium browsers.
Start the Creo TOOLKIT APIWizard by pointing your browser to:
<creo_toolkit_loadpoint>\protkdoc\index.html
A page containing links to the Creo TOOLKIT APIWizard and User’s Guide will open in the web browser.
APIWizard
Click APIWizard to open the list of Creo TOOLKIT Objects and the related functions. Click a function name to read more about it.
Use the search field at the top of the left pane to search for functions. You can search using the following criteria:
•  Search by API names
•  Search using wildcard character *, where * (asterisk) matches zero or more nonwhite space characters
The search displays the resulting API names with embedded links in a drop down list. The deprecated APIs are highlighted in yellow.
User’s Guide
Click User’s Guide to access the Creo Toolkit User’s Guide.
Creo Toolkit Style
Creo TOOLKIT uses an object-oriented programming style. Data structures for the transfer information between Creo Parametric and the application are not directly visible to the application. These data structures are accessible only with Creo TOOLKIT functions.
Objects and Actions
The most basic Creo TOOLKIT concepts are objects and actions.
Each Creo TOOLKIT library C function performs an action on a specific type of object. The Creo TOOLKIT convention for function names is the prefix “Pro” the name of the object type, and the name of the action it performs, for example:
ProSectionLocationGet()
A Creo TOOLKIT object is a well-defined and self-contained C structure used to perform actions relevant to that object. Most objects are items in the Creo Parametric database, such as features and surfaces. Others, however, are more abstract or transient, such as the information resulting from a select action.
In Creo TOOLKIT, each type of object has a standard name consisting of a “Pro” plus capitalized word that describes the object. Simple examples of Creo TOOLKIT object types and their Creo Parametric equivalents are as follows:
•  ProFeature—A feature
•  ProSurface—A surface
•  ProSolid—An abstract object created to exploit the commonality between parts and assemblies
•  ProWcell—A workcell feature in a manufacturing assembly
Creo TOOLKIT provides a C typedef for each object used for variables and arguments that refer to those objects. Creo TOOLKIT objects have a hierarchical relationship that reflects the Creo Parametric database. For example, a ProFeature object can contain objects of type ProSurface (among others).
For example, the following functions have actions that are single verbs:
ProSolidRegenerate()
ProFeatureDelete()
Some Creo TOOLKIT functions require names that include more than one object type. The function names have the object types first, then the action. For example:
ProFeatureParentsGet()
ProWcellTypeGet()
The action verbs indicate the type of action being performed, as shown in the following table.
Action Verb
Type of Action
Get
Read information directly from the Creo Parametric database.
Eval
Provide the result of a simple calculation.
Compute
Provide the result of a computation that typically involves numerical analysis of the model geometry.
Examples are:
•  ProEdgeLengthEval()
•  ProSurfaceAreaEval()
•  ProSolidRayIntersectionCompute()
To illustrate further, function ProSolidOutlineGet() reads from Creo Parametric the currently stored solid outline, but ProSolidOutlineCompute() invokes a recomputation of that information. Use ProSolidOutlineCompute() to compute an accurate outline of a solid.
Note
Do not use ProSolidOutlineGet() to calculate the outline of a solid. It will not return a properly calculated outline.
Other Creo TOOLKIT function conventions are that the first argument identifies the object, and input arguments come before output arguments.
Function Prototyping
Each Creo TOOLKIT function has an ANSI function prototype. (The C compilers on platforms supported by Creo TOOLKIT provide at least the option of function prototype checking.) All function prototypes for a particular Creo TOOLKIT object reside in a header file named for that object. For example, the prototype for function ProEdgeLengthEval() is located in the header file ProEdge.h.
Note
PTC strongly recommends that you use prototyping. Make sure you include the appropriate header files in your Creo TOOLKIT application.
Function Error Statuses
The return type of most Creo TOOLKIT functions is ProError. ProError is an enumerated type with a value for each common case where Creo TOOLKIT functions succeeds or fails.
The normal value for success is PRO_TK_NO_ERROR. The other “failure” statuses occur when there is a genuine problem, or for more benign reasons. For example, these error statuses denote genuine problems:
•  PRO_TK_BAD_INPUTS—The Creo TOOLKIT program called the function incorrectly.
•  PRO_TK_OUT_OF_MEMORY or PRO_TK_COMM_ERROR—System failure.
The following statuses are more benign:
•  PRO_TK_USER_ABORT—A function that supports user interaction was aborted by the Creo Parametric user.
•  PRO_TK_E_NOT_FOUND—A function attempted operation on an empty object list.
Users must pay careful attention to how their program reacts to a Creo TOOLKIT function error status—there can be several types of failure and success, each requiring different handling.
The subset of ProError values that a particular Creo TOOLKIT function can return is described in the browser under that function. Possible errors are also included in a comment under each function prototype in the corresponding Creo TOOLKIT header file.
Installing Creo Toolkit
The next sections describe how to install Creo TOOLKIT.
Overview
Creo TOOLKIT is on the same DVD as Creo Parametric, so you do not need to arrange a special delivery from your supplier. When Creo Parametric is installed using PTC.Setup, one of the optional components is API Toolkits. This includes Creo TOOLKIT, Pro/WebLink, J-Link, VB, and Creo Object TOOLKIT C++ and Creo Object TOOLKIT Java.
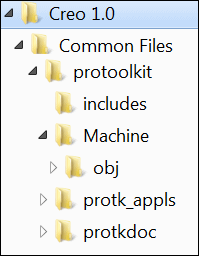
If you select Creo TOOLKIT, it is installed under the loadpoint of Creo Parametric at the location <creo_loadpoint>\<version>\Common Files\protoolkit. The protoolkit directory contains all the headers, libraries, example applications, and documentation specific to Creo TOOLKIT.
The following figure shows the tree of directories found under the Creo TOOLKIT loadpoint after installation.
Creo Toolkit Installation Directory Tree
Image
The directory protk_appls contains sample Creo TOOLKIT applications. For more information regarding the sample applications refer to the Appendix on Sample Applications.
Add or Update Creo Toolkit Installation
Add a Creo TOOLKIT installation to an existing Creo Parametric installation using the Update option in PTC.Setup. For a description of using PTC.Setup, refer to the Creo Parametric Installation and Administration Guide.
Be sure your system administrator reinstalls Creo TOOLKIT each time they update your Creo Parametric installation from a new CD. PTC recommends that, when possible, you use a Creo TOOLKIT from the same build number as Creo Parametric.
Note
The Creo Parametric library functions work by invoking functions inside the Creo Parametric executable, so an update to Creo TOOLKIT often involves a change to Creo Parametric rather than Creo TOOLKIT itself. So when you receive a Creo Parametric DVD that contains an update to Creo TOOLKIT, always reinstall Creo Parametric from that DVD.
In many situations it will be inconvenient or impossible to ensure that the users of your Creo TOOLKIT application will use the same build of Creo Parametric that you used to compile and link the Creo TOOLKIT application. Refer to section Version Compatibility: Creo Parametric and Creo Toolkit for the rules to mix versions of Creo Parametric and Creo TOOLKIT.
Testing the Creo Toolkit Installation
After your system administrator has installed Creo TOOLKIT, you should compile, link, and run a simple Creo TOOLKIT application as soon as possible on each machine you intend to use for development. This provides an independent test of the following items:
•  The installation of Creo TOOLKIT is present, complete, and visible from your machine.
•  The version of Creo Parametric you plan to use during development has the Creo TOOLKIT license option added to it.
•  The machine you will use for development has access to all the necessary C program development tools, in versions supported by Creo TOOLKIT (especially, of course, the C compiler and linker).
Running the Microsoft Visual Studio Solution
PTC provides a ready-to-use Visual Studio solution on the Windows platform to build and test Creo TOOLKIT applications by using an appropriate makefile. For the version of Visual Studio compatible with the release of Creo TOOLKIT, refer to the hardware notes at Creo Future Platform Support Summary.
This ready-to-use Visual Studio solution has the following advantages:
•  Provides an effective way to build and test sample applications provided by PTC.
•  Provides a preconfigured Visual Studio development environment for use with Creo TOOLKIT.
•  Supports Intellisense for Creo TOOLKIT functions.
Note
  The supported version of Visual Studio changes with every release of Creo TOOLKIT, and hence the compiler flags and libraries also change. For every release, you must download the latest version of the ready-to-use Visual Studio solution from the creo_toolkit_loadpoint.
  In Creo Parametric 11.0.0.0 and later, Creo TOOLKIT supports Visual Studio 2022. The compiler flags and libraries are available for Visual Studio 2022. Creo TOOLKIT no longer supports Visual Studio 2019.
All Creo TOOLKIT applications on 64-bit Windows platforms built using the Microsoft Visual Studio 2022 compiler must set the configuration property Platform Toolset as Visual Studio 2022 (v17.6.5).
When you install Creo TOOLKIT, the file protk_install_example.zip is installed under the <creo_toolkit_loadpoint> at $<machine_type>\obj. To use this solution:
1. Unzip protk_install_example.zip. The following files and directories are available:
Directory or File
Description
make_install.sln
Specifies the ready-to-use Visual Studio solution file.
make_install
Contains the makefile project and the creotk.dat file.
2. Open Microsoft Visual Studio.
3. Click File  Open  Project/Solution. The Open Project dialog opens.
4. Browse the protk_install_example directory and select make_install.sln.
5. Click Open to access the solution file.
The make_install makefile project is available in Visual Studio.
Running the Makefile Project
1. Click Build  Build make_install. The application should build without errors. This creates the Creo TOOLKIT DLL file called pt_inst_test.dll. If the application fails, check that the environment variable PROTOOL_SRC is set correctly.
2. Modify the exec_file and text_dir fields in the creotk.dat file located in the make_install directory to specify the full path to pt_inst_test.dll and \text, respectively. For example,
   exec_file <full_path>\pt_inst_test.dll
   text_dir <full_path>\text
  
3. Unlock the application, using the following command:
<creo_loadpoint>/<version>/Parametric/bin/protk_unlock.bat <path to executables or DLLs to unlock>.
4. Start Creo Parametric.
5. On the Tools tab, in the Utilities group, click Auxiliary Applications. The Auxiliary Applications dialog box opens.
6. Click Register to register the updated creotk.dat file. The Register auxiliary application dialog box opens.
7. Browse to the <full_path> and select creotk.dat.
8. Click Open. The Creo TOOLKIT application adds the command Install Test under the Tools  File menu in the TOOLKIT group in the Home tab on the Creo Parametric ribbon user interface.
Note
Refer to the Creo Parametric Help for more information on customizing the Ribbon.
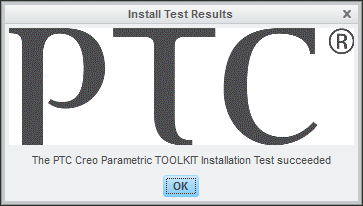
9. Click Tools and then click File  Install Test. The Creo TOOLKIT Install Test Results message window opens, indicating that the installation test has succeeded.
Image
10. Click OK.
To run other sample applications provided by PTC, follow these steps:
1. Copy the required makefile from <creo_toolkit_loadpoint>\$<machine_type>\obj to the make_install directory of the ready-to-use Visual Studio solution.
If you are working on a 64-bit Windows platform, copy the file from <creo_toolkit_loadpoint>\x86e_win64\obj.
2. Copy the text directory associated with the sample application from <creo_toolkit_loadpoint>\protk_appls\<app_name>\text to the make_install directory.
3. Open Visual Studio and set the values of the following variables in the makefile:
PROTOOL_SRC = ../../../../../protoolkit
PROTOOL_SYS = $(PROTOOL_SRC)/$(PRO_MACHINE_TYPE)
4. Click Project  Properties to update the NMake properties of the project.
5. Click Build  Rebuild make_install. The application builds and creates a new .dll file.
6. Update the creotk.dat file located in the make_install directory with the name of the sample application and the DLL file.
7. Modify the exec_file and text_dir fields in the creotk.dat file to specify the full path to the .dll file and \text directory, respectively.
8. Start Creo Parametric.
9. On the Home tab, in the Utilities group, click Auxiliary Applications or click Tools  Auxiliary Applications. The Auxiliary Applications dialog box opens.
10. Click Register to register the updated creotk.dat file. The Register auxiliary application dialog box opens.
11. Browse to the full path and select creotk.dat.
12. Click Open. The Creo TOOLKIT application runs.
Building a Sample Application
The Creo TOOLKIT loadpoint includes the source of a simple application designed specifically to test the Creo TOOLKIT installation. The steps required to build and run the test application are described in the following sections.
In this explanation, <creo_toolkit_loadpoint> refers to the directory that forms the loadpoint of Creo TOOLKIT, and <machine_type> refers to the name of the type of platform you are using (for example, i486_nt).
Step 2—Register
In the same directory, create a text file called creotk.dat. This file is the “registry file” that tells Creo Parametric about the Creo TOOLKIT application. Refer to the Registering a Creo Toolkit Application and Sample Registry Files sections for syntax requirements for this file. The creotk.dat file should contain the following lines:
     name install_test
     exec_file pt_inst_test.exe
     text_dir <creo_toolkit_loadpoint>/protk_appls/pt_install_test
     end
Note
Use the delimiter character \in creotk.dat.
Step 3—Run Creo Parametric
Run Creo Parametric from the directory that contains the creotk.dat file; Creo Parametric starts the Creo TOOLKIT application in multiprocess mode (see the section How Creo Toolkit Works for more information on multiprocess mode). You should see that the Install Test command has been added in the TOOLKIT group in the Home tab on the Creo Parametric ribbon user interface. Click Tools and then click File  Install Test. The Creo TOOLKIT application displays a custom dialog indicating whether the installation test has succeeded:
Install Test Results Dialog Box
Image
Failure or error messages at this stage could be due to the following reasons:
•  You made a mistake when creating the creotk.dat file. If the syntax or contents are wrong, you should see a self-explanatory message in the window from which you started Creo Parametric.
•  The Creo Parametric you ran is not licensed for Creo TOOLKIT. This also causes an explanatory message to be displayed in the startup window.
•  The Creo TOOLKIT executable you created in Step 1 is wrong in some way: it is for the wrong platform, for example, or might not have execute access. You can check this by trying to execute the file directly by typing its name. If the file is correct, the program prints the following messages and then terminates:
                 pt_inst_test: insufficient arguments; need 2 arguments:
                    (1) own RPC program #
                    (2) root directory path for Pro/TOOLKIT text files.
If the file is incorrect, the exact message will depend on which platform you are using, but should explain the cause of the problem.
Step 4—Repeat the Test in DLL Mode
To build for DLL mode, use the same makefile, but use the following line instead of the line nmake -f make_install:
     nmake -f make_install dll
This creates a file called pt_inst_test.dll, which is the library to be dynamically linked.
Next, make these two changes to the creotk.dat file:
Add this line after the first line:
    startup dll
Change the exec_file statement to reference the new Creo TOOLKIT file. Use the executable name pt_inst_test.exe in the second line, and the Windows directory syntax in the third line.
You can run Creo Parametric and look at the behavior of the Creo TOOLKIT application exactly as in Step 3.
See How Creo Toolkit Works for more information on DLL mode.
Developing a Creo Toolkit Application
This section describes how Creo TOOLKIT works and the steps you need to take after installing Creo TOOLKIT to create a Creo TOOLKIT application. The topics are as follows:
How Creo Toolkit Works
The standard method by which Creo TOOLKIT application code is integrated into Creo Parametric is through the use of dynamically linked libraries (DLLs). When you compile your Creo TOOLKIT application C code and link it with the Creo TOOLKIT library, you create an object library file designed to be linked into the Creo Parametric executable when Creo Parametric starts up. This method is referred to as DLL mode.
Creo TOOLKIT also supports a second method of integration: the “multiprocess,” or spawned mode. In this mode, the Creo TOOLKIT application code is compiled and linked to form a separate executable. This executable is designed to be spawned by Creo Parametric and runs as a child process of the Creo Parametric session. In DLL mode, the exchanges between the Creo TOOLKIT application and Creo Parametric are made through direct function calls. In multiprocess mode, the same effect is created by an inter-process messaging system that simulates direct function calls by passing the information necessary to identify the function and its argument values between the two processes.
Multiprocess mode involves more communications overhead than DLL mode, especially when the Creo TOOLKIT application makes frequent calls to Creo TOOLKIT library functions, because of the more complex method of implementing those calls. However, it offers the following advantage: it enables you to run the Creo TOOLKIT application with a source-code debugger without also loading the whole Creo Parametric executable into the debugger. See the section Using a Source-Code Debugger on a Creo Toolkit Application for more details.
You can use a Creo TOOLKIT application in either DLL mode or multiprocess mode without changing any of the C source code in the application. (The methods of setting the mode are described in detail later in this chapter.)
It is also possible to use more than one Creo TOOLKIT application within a single session of Creo Parametric, and these can use any combination of modes.
If you use multiprocess mode during development of your application to debug more easily, you should switch to DLL mode when you install the application for your end users because the performance is better in that mode. However, take care to test your application thoroughly in DLL mode before you deliver it. Any programming errors in your application that cause corruption to memory used by Creo Parametric or Creo TOOLKIT are likely to show quite different symptoms in each mode, so new bugs may emerge when you switch to DLL mode.
Although multiprocess mode involves two processes running in parallel, these processes do not provide genuine parallel processing. There is, however, another mode of integrating a Creo TOOLKIT application that provides this ability, called “asynchronous mode.” (Asynchronous mode is described in detail in the section Core: Asynchronous Mode.) The DLL and multiprocess modes are given the general name “synchronous mode.” An asynchronous Creo TOOLKIT application is fundamentally different in its architecture from a synchronous mode application, so you should choose between these methods before writing any application code. As a general rule, synchronous mode should be the default choice unless there is some unavoidable reason to use asynchronous mode, because the latter mode is more complex to use.
Note
•  All Creo TOOLKIT calls running in either synchronous (DLL or multiprocess) mode or asynchronous mode always clear the Undo/Redo stack in the Creo Parametric session. The Creo Parametric user interface reflects this by making the Undo and Redo menu options unavailable.
•  When you invoke the Creo TOOLKIT application, ensure that no dialogs are open in Creo Parametric session. If Creo Parametric dialog is open, the results may be unpredictable.
Compiling and Linking a Creo Toolkit Application
This section describes compiling and linking Creo TOOLKIT applications.
Makefiles
The C compiler options and system libraries needed to compile and link a Creo TOOLKIT application are different on each platform. To ensure that the makefile you use for building your Creo TOOLKIT application uses the correct options, you should base your makefile on one of the makefiles located under the <creo_toolkit_loadpoint>. These are designed for building the various Creo TOOLKIT applications whose source is included in the Creo TOOLKIT installation.
An example of one of the Creo TOOLKIT applications provided is the installation test, whose source code is under the directory <creo_toolkit_loadpoint>\protk_appls\pt_install_test, where <creo_toolkit_loadpoint> is the loadpoint directory of the Creo TOOLKIT installation. The makefile for the installation test application is <creo_toolkit_loadpoint>\$<machine_type>\obj\make_install.
To use this as the model for your own makefile, copy it to the directory that will contain your Creo TOOLKIT source code, then make the following changes to it:
•  Change the macro MAKEFILENAME to refer to the makefile by its new name.
•  Change the macros EXE and EXE_DLL to define output file names more suitable for your own application.
•  Change the macro PROTOOL_SRC to refer to the loadpoint of Creo TOOLKIT.
•  Change the macro OBJS to refer to the object files that will result from compiling your Creo TOOLKIT source files.
•  Add targets for those object files. These contain instructions for
•  compiling your C source files. The form of these target definitions can be copied from the ones in the original makefile. They generally take the following form:
        myfile.o:  myfile.c
                $(CC) $(CFLAGS) myfile.c
Note
The second line must start with a tab character.
If you want to use a debugger with your Creo TOOLKIT application, you can also add the appropriate compiler switch (usually “-g”) to the CCFLAGS macro.
If you are rebuilding an existing Pro/TOOLKIT application with a new version of Creo TOOLKIT, remember to repeat these steps to set up a new makefile—do not continue to use a makefile created for the previous version. You must do this in case the compiler switches or system libraries needed to build a Creo TOOLKIT application have changed in the new version.
Registering a Creo Toolkit Application
Registering a Creo TOOLKIT application means providing Creo Parametric with information about the files that form the Creo TOOLKIT application. To do this, create a small text file called the Creo TOOLKIT registry file, that Creo Parametric will find and read.
Creo Parametric searches for the registry file as follows:
•  In the absolute path specified in the creotkdat, protkdat, prodevdat, and toolkit_registry_file statements in the Creo Parametric configuration file.
•  For the files named creotk.dat, protk.dat, or prodev.dat in the following locations:
1. The starting directory
2. <creo_loadpoint>\<version>\Common Files\$<machine_type>\text\<language>
3. <creo_loadpoint>\<version>\Common Files\text
4. <creo_loadpoint>\<version>\Common Files\text\<language>
In the preceding locations, the variables are as follows:
•  <creo_loadpoint>—The Creo Parametric loadpoint (not the Creo TOOLKIT loadpoint).
•  <machine_type>—The machine-specific subdirectory, such as, i486_nt or x86e_win64. Set the environment variable PRO_MACHINE_TYPE to define the type of machine on which Creo Parametric is installed.
If more than one registry file having the same filename exists in this search path, Creo Parametric stops searching after finding the first instance of the file and starts all the Creo TOOLKIT applications specified in it. If more than one registry file having different filenames exist in this search path, Creo Parametric stops searching after finding one instance of each of them and starts all the Creo TOOLKIT applications specified in them.
Note
•  Option 1 is normally used during development, because the Creo TOOLKIT application is seen only if you start Creo Parametric from the specific directory that contains the registry file.
•  Option 3 is recommended when making an end-user installation, because it makes sure that the registry file is found no matter what directory is used to start Creo Parametric.
The registry file is a simple text file, where each line consists of one of a predefined set of keywords, followed by a value.
The standard form of the registry file in DLL mode is as follows:
     name YourApplicationName
     startup dll
     exec_file $LOADDIR/$MACHINE_TYPE/obj/filename.dll
     text_dir $LOADDIR
     end
The fields of the registry file are as follows:
•  name—Assigns a unique name to this Creo TOOLKIT application.
•  startup—Specifies the method Creo Parametric should use to communicate with the Creo TOOLKIT application. The example above specifies the DLL mode.
•  exec_file—Specifies the full path and name of the file produced by compiling and linking the Creo TOOLKIT application. The example above shows a typical use of environment variables to make the reference to the executable file more flexible.
•  text_dir—Specifies the full path name to text directory that contains the language-specific directories. The language-specific directories contain the message files, menu files, resource files and UI bitmaps in the language supported by the Creo TOOLKIT application.
Note
The fields exec_file and text_dir have a character limit of PRO_PATH_SIZE-1 wide characters (wchar_t).
•  end—Indicates the end of the description of this Creo TOOLKIT application.
If you want to run the application in multiprocess mode, make the following changes to the registry file:
•  Change the startup statement to:
     startup spawn
•  Make the exec_file statement refer to the Creo TOOLKIT program executable.
Note
For all Creo TOOLKIT plugins, the registry file protk.dat is located inside the %ProgramData%\PTC\<Creo Toolkit version>\Plugins subdirectories. All registry files located in this location must use the absolute path in all their entries.
For more information about the registry file, refer to the section Creo Toolkit Registry File.
Limit on the Number of Loaded Applications
Previous versions of Pro/ENGINEER limited the number of applications that could be specified in the registry files; there is no such limit for Pro/ENGINEER Wildfire 2.0 onwards. However, most platforms do have limits for the size of a process, the total size of all processes, and the number of processes that a single process can spawn. PTC recommends that you combine related applications into the same binary file wherever possible to avoid running into these limits.
Version Compatibility: Creo Parametric and Creo Toolkit
In many situations it will be inconvenient or impossible to ensure that the users of your Creo TOOLKIT application use the same build of Creo Parametric used to compile and link the Creo TOOLKIT application. This section summarizes the rules for mixing Creo TOOLKIT and Creo Parametric versions. The Creo TOOLKIT version is the Creo Parametric CD version from which the user installed the Creo TOOLKIT version used to compile and link the application.
Functions Introduced:
Superseded Functions
The function ProToolkitMajorVersionGet() returns the version number of the Creo Parametric executable to which the Creo TOOLKIT application is connected. This number is an absolute number and represents the major release of the product. The version number of Creo Parametric 8.0 is 40.
The function ProEngineerReleaseNumericversionGet() is deprecated. Use the function ProToolkitMajorVersionGet() instead.
Note
From Pro/ENGINEER Wildfire 4.0 onwards applications built with libraries older than Pro/ENGINEER 2001 will not run. You must recompile these applications with later versions of the Pro/TOOLKIT libraries.
The following points summarize the rules for mixing Creo Elements/Pro TOOLKIT and Creo Elements/Pro versions.
•  Pro/ENGINEER release older than Pro/TOOLKIT release:
Not supported
•  Creo Parametric release newer than a Creo TOOLKIT release:
This works in many, but not all, cases. The communication method used to link Creo TOOLKIT to Creo Parametric provides full compatibility between releases. However, there are occasional cases where changes internal to Creo Parametric may require changes to the source code of a Creo TOOLKIT application in order that it continue to work correctly. Whether you need to convert Creo TOOLKIT applications depends on what functionality it uses and what functionality changed in Creo Parametric and Creo TOOLKIT. PTC makes every effort to keep these effects to a minimum. The Release Notes for Creo TOOLKIT detail any conversion work that could be necessary for that release.
•  Creo Parametric build newer than Creo TOOLKIT build
This is always supported.
Application Compatibility: Creo Parametric and Creo Toolkit on Different Architecture
In some situations it will be inconvenient or impossible to ensure that the users of your Creo TOOLKIT application use a machine with the same operating system and architecture as the machine on which it was compiled. An example might be an application integrating with a third party library which is only available as 32-bit architecture, but needs to be run with Creo Parametric on a 64-bit architecture machine with the same operating system. Creo TOOLKIT provides limited capability to support these situations in spawn and asynchronous mode only. DLL applications must always be compiled on machines with the same operating system and architecture as the Creo Parametric executable.
The following situations might occur:
•  Creo TOOLKIT application compiled on the same architecture and operating system as Creo Parametric. This is always supported.
•  Creo TOOLKIT application compiled on a machine with a smaller pointer size (native data size) than the machine on which the application is run For example, a Creo TOOLKIT application built on Windows 32-bit running on an Windows-64 bit installation of Creo Parametric. This is supported for spawn and asynchronous mode only.
•  Creo TOOLKIT application compiled on a machine with a larger pointer size (native data size) than the machine on which the application is run. For example, a Creo TOOLKIT application built on Windows-64 bit machine running on an Windows-32 bit installation of Creo Parametric. This is not supported.
Stopping and Restarting a Creo Toolkit Application
Creo TOOLKIT supports the ability to stop and restart a synchronous application within a single session of Creo Parametric. This is particularly useful during development of an application because it enables you to make changes to your source code and retest it without having to restart Creo Parametric and reload your test models. Use the Auxiliary Applications dialog box to stop and restart applications.
To make this option available, the registry file (default name protk.dat should contain one of the following lines:
Multiprocess mode:
     startup spawn
DLL mode:
     startup DLL
If you want to be able to stop and restart your Creo TOOLKIT application within Creo Parametric, you must also add the following statement to the definition of the application in the registry file:
     allow_stop TRUE
To access the Auxiliary Applications dialog box, on the Home tab, in the Utilities group, click Auxiliary Applications or click Tools  Auxiliary Applications. The dialog box displays a list of Creo TOOLKIT applications identified by the name defined in the name statement in its registry file. Only applications that a user can start or stop are displayed. This dialog box also shows the current state of an application and allows an application to be started or stopped.
When a user starts an application from the Auxiliary Applications dialog box, Creo Parametric freezes the user interface until the application connects to it.
If you use the allow_stop option, you might also set Creo Parametric to not start the Creo TOOLKIT application until you explicitly request it. To do this, you must add the following statement in your registry file:
     delay_start TRUE
To start your application in Creo Parametric, choose Auxiliary Applications from the Tools tab, select your application from the list, then click the Start button.
In addition to Start, Stop, and Close, the dialog box includes the following buttons:
•  Register—Enables you to register a Creo TOOLKIT application whose registry file was not present when Creo Parametric was started.
•  Info—Reports the following information about each currently registered Creo TOOLKIT application:
  The names of the executable file and text directory
  The version number used to build the application
  Whether the application is currently running
There are a few other, less commonly used options in the registry file. All the options are described fully in the Creo Toolkit Registry File section .
Note
You can delete registration information on any application that is not running.
When stopping an application, make sure that no application-created menu buttons are current. To do this, before you exit an application you must choose a command that interrupts the current menu command.
Using a Source-Code Debugger on a Creo Toolkit Application
For a full description of how to debug Creo TOOLKIT applications, see section Debugging Creo TOOLKIT Applications. This section also describes optional methods of debugging a Creo TOOLKIT application.
Unlocking a Creo Toolkit Application
Before you distribute your application executable to the end user, you must unlock it. This enables the end user (your customer) to run your applications without having Creo TOOLKIT as an option. In Creo Parametric 6.0.0.0 and later you can digitally sign your application.
To unlock your application, enter the following command:
     <creo_loadpoint>/<version>/Parametric/bin/protk_unlock [-c] [-cd]
<path to executables or DLLs to unlock>
Note
•  The Creo TOOLKIT application is unlocked even if you do not specify the -c option.
•  To unlock and digitally sign your application, specify the -cd option. Note that it is mandatory to sign your application if you use the -cd option. See the section Digitally Signing the Application, for more information on digitally signing your application.
More than one Creo TOOLKIT binary file may be supplied on the command line.
Note
Once you have unlocked the executable, you can distribute your application program to Creo Parametric users in accordance with the license agreement.
Using protk_unlock requires a valid Creo TOOLKIT license be present and unused on your license server. If the Creo Parametric license server is configured to add a Creo TOOLKIT license as a Startup option, protk_unlock will cause the license server to hold only the Creo TOOLKIT option for 15 minutes. The license will not be available for any other development activity or unlocking during this period.
If you use -cd option to unlock your application, a message appears asking you to digitally sign your application before using it in Creo.
If the only available Creo TOOLKIT license is locked to a Creo Parametric license, the entire Creo Parametric license including the Creo TOOLKIT option will be held for 15 minutes. PTC recommends you configure your Creo TOOLKIT license option as startup options to avoid tying up your Creo Parametric licenses.
Note
Only one license will be held for the specified time period, even if multiple applications were successfully unlocked.
Unlocking the application may also require one or more advanced licensing options. The protk_unlock application will detect whether any functions using advanced licenses are in use in the application, and if so, will make a check for the availability of the advanced license option. If that option is not present, unlocking will not be permitted. If they are present, the unlock will proceed. Advanced options are not held on the license server for any length of time. For more information refer to the Advanced Licensing Options section.
If the required licenses are available, the protk_unlock application will unlock the application immediately. An unlocked application does not require any of the Creo TOOLKIT license options to run. Depending on the functionality invoked by the application, it may still require certain Creo Parametric options to work correctly.
Note
Once an application binary has been unlocked, it should not be modified in any way (which includes statically linking the unlocked binary with other libraries after the unlock). The unlocked binary must not be changed or else Creo Parametric will again consider it "locked".
Digitally Signing the Application
In Creo Parametric 6.0.0.0 and later, you can digitally sign your application. Use the standard Microsoft utility SignTool to digitally sign your application. See the Microsoft documentation for more information on this utility and to create the digital certificate.
In Creo Parametric 7.0.0.0 and later, Creo checks signatures of Creo TOOLKIT applications at load time.
The following configuration options control whether to always allow the users or administrator to determine whether signed or unsigned Creo TOOLKIT applications should be allowed to always run, to never run, or to prompt the user before running:
•  open_protk_unsigned_apps—Controls whether unsigned applications can be loaded in a Creo session. It can have the following values:
  Always—Always loads unsigned applications.
  Never—Never load unsigned applications.
  Prompt—Asks the user whether to load unsigned applications.
•  open_protk_signed_apps—Controls whether signed applications can be loaded in a Creo session. It can have the following values:
  Always—Always loads signed applications.
  Never—Never load signed applications.
  Prompt—Asks the user whether to load signed applications.
Unlock Messages
The following table lists the messages that can be returned when you unlock a Creo TOOLKIT application.
Message
Cause
<application name>:Successfully unlocked application.
The application is unlocked successfully.
Usage: protk_unlock <one or more Creo TOOLKIT executables or DLLs>
No arguments supplied.
<application name>:ERROR: No READ access
<application name>:ERROR: No WRITE access
You do not have READ/WRITE access for the executable.
<application name>:Executable is not a Creo TOOLKIT application.
The executable is not linked with the Creo TOOLKIT libraries, or does not use any functions from those libraries.
<application name>:Executable is already unlocked.
The executable is already unlocked.
Error: Licenses do not contain Creo TOOLKIT License Code.
A requirement for unlocking a Creo TOOLKIT application.
ERROR: No Creo Parametric licenses are available for the startup command specified
Could not contact the license server.
<application name>:Unlocking this application requires option TOOLKIT-for-3D_Drawings.
The application uses functions requiring an advanced option; and this option is not available.
The license option 222, that is, the TOOLKIT-for-3D_Drawings license is not available.
<application name>:Unlocking this application requires option TOOLKIT-for-Mechanica.
The application uses functions requiring an advanced option; and this option is not available.
The license option 223, that is, the TOOLKIT-for-Mechanica license is not available.
Checking the Status of the Creo Toolkit Application
You can use the command protk_unlock along with the option -readall to check or verify if the Creo TOOLKIT application is locked or unlocked.
•  If your application is non-digitally signed, use the following command:
     <creo_loadpoint>/<version>/Parametric/bin/protk_unlock.exe -readall 
<path to executables or DLLs to unlock>
The status of the application is shown as UNLOCKED.
•  If your application is digitally signed, use the option -d along with the readall option.
The status of the application is shown as UNLOCKED.
•  If you are trying to unlock a digitally signed application using the option -cxxd, you will see the following message:
The application is digitally signed.
You can not unlock this application which is digitally signed.
Please rebuild the application, unlock and then digitally sign.
Structure of a Creo Toolkit Application
The contents of this section refer to the use of synchronous mode. For information on asynchronous mode applications, see section Core: Asynchronous Mode.
Essential Creo Toolkit Include Files
The only header file you must always include in every source file of your Creo TOOLKIT application is ProToolkit.h. This file must always be present, and must be the first include file because it defines the value of wchar_t, the type for characters in a wide string, referenced from many other include files. ProToolkit.h also includes these standard include files:
•  stdio.h
•  string.h
•  stddef.h
•  stdlib.h
Therefore, you do not need to include these header files explicitly in your application.
When you use functions for a particular Creo TOOLKIT object, you should always include the header file that contains the function prototypes for those functions. If you do not do this, or omit some, you lose the benefit of function argument type-checking during compilation. The header file ProObjects.h, which contains the declarations of the object handles, is included indirectly in each of the header files that contains function prototypes, and so does not need to be included explicitly.
For example, if you are using the function ProSurfaceAreaEval(), you should include the file ProSurface.h, which contains the prototype of that function, but you do not need to include ProObjects.h in order to see the definition of ProSurface, because ProObjects.h is included in ProSurface.h.
Core of a Creo Toolkit Application
Functions Introduced:
  • user_initialize()
  • ProEngineerDisplaydatecodeGet()
  • user_terminate()
  • A Creo TOOLKIT application must always contain the functions user_initialize() and user_terminate(). These functions have the prefix “user_” because they are written by the Creo TOOLKIT application developer, but they are called from within Creo Parametric at the start and end of the session.
    The function user_initialize() initializes a synchronous-mode Creo TOOLKIT application. This function must be present in any synchronous mode application in order for it to be loaded into Creo Parametric. Use this function to setup user interface additions, or to run the commands required for a non-interactive application. user_initialize() is called after the Creo Parametric application has been initialized and the graphics window has been created. It should contain any initializations that your Creo TOOLKIT application needs, including any modification of Creo Parametric menus (such as adding new buttons).
    Note
    •  user_initialize() must contain at least one Creo TOOLKIT API call. Failure to do so causes the Creo TOOLKIT application to fail and return PRO_TK_GENERAL_ERROR.
    •  When coding a Creo TOOLKIT application in C++ you must declare the function user_initialize() as extern "C".
    The user_initialize() function is called with a number of optional arguments that can add to your function definition. All input and output arguments to this function are optional and do not need to be in the function signature. These arguments provide information about command-line arguments entered when Creo Parametric was invoked, and the revision and build number of the Creo Parametric in session. Refer to section the section user_initialize() Arguments for more information on the function arguments.
    The initialization function must return 0 to indicate that the Creo TOOLKIT application was initialized successfully. Any other return value will be interpreted as a failure, and the system will notify the Creo Parametric user that the Creo TOOLKIT application failed. Use the optional output argument to user_initialize() to specify the wording of this error message.
    The call to Creo TOOLKIT application using the function user_initialize() is delayed until Creo Platform Agent is loaded. When you install a Creo application, an appropriate version of the Creo Platform Agent also gets installed. The Platform Agent is used for all browser-related functionalities, which includes interaction with Windchill. So, to run a Creo TOOLKIT application which interacts with Windchill using functions, Creo Platform Agent must be initialized first before running the Creo TOOLKIT application.
    The Creo Platform Agent is always initialized first by default. The Creo TOOLKIT applications are delayed until the Platform Agent is fully initialized. The Platform Agent must load in a maximum of 60 seconds, beyond which the agent will time out. If the Platform Agent fails to load, the Creo TOOLKIT application will not start and an error message is displayed. You can override this behavior and start the Creo TOOLKIT application, even if the Platform Agent has not loaded using the following environment variables. The valid values for these variables are true and false.
    •  PROTK_DELAYINIT_NO_DELAY—Initiates Creo Platform Agent. However, Creo TOOLKIT applications are initiated, without waiting for Platform Agent to load.
    •  PROTK_DELAYINIT_ALWAYS_INIT—Waits for Creo Platform Agent to load. However, it initiates the Creo TOOLKIT application even if Creo Platform Agent fails to load or times out.
    Note
    If both the variables are set, then the environment variable PROTK_DELAYINIT_NO_DELAY takes precedence.
    Note
    The Creo Parametric visible version format has changed. user_initialize() continues to receive the classic format based on the year and week of the Creo Parametric build.
    The function ProEngineerDisplaydatecodeGet() returns the user-visible version string from Creo Parametric. Applications that present a version string to users in messages and information should use the new format for the Creo Parametric displayed version.
    The function user_terminate() is called at the end of the Creo Parametric session, after the user selects Yes on the Exit confirmation dialog box. Its return type is void.
    Note
    When coding a Creo TOOLKIT application in C++ you must declare the function user_terminate() as extern "C".
    The following example is the empty core of a Creo TOOLKIT application. This code should always be the starting point of each new application you develop.
         #include "ProToolkit.h"
         int user_initialize()
         {
             return (0);
         }
         void user_terminate()
         {
         }
    If you use the options to start and stop a multiprocess-mode Creo TOOLKIT application within a Creo Parametric session, user_initialize() and user_terminate() are called upon starting and stopping the Creo TOOLKIT process only. However, any menu modifications defined in user_initialize() will be made, even if this involves repainting menus that are already displayed. All of these modifications will be reset when the Creo TOOLKIT application is stopped.
    user_initialize() Arguments
    user_initialize() is called with a number of input and output arguments. As always in C, if you don't need to use an argument, your function does not need to declare it, provided that it declares all the arguments up to the last one used.
    The input arguments are:
    int arg_num
    Number of command-line arguments.
    char *argc[]
    Command-line arguments passed by Creo Parametric. (See further explanation below.)
    char* version
    Release name of the Creo Parametric being used.
    Note: From Pro/ENGINEER Wildfire 4.0 onwards applications built with libraries older than Pro/ENGINEER 2001 will not run. You must recompile these applications with later versions of the Pro/TOOLKIT libraries.
    char* build
    The build number of the Creo Parametric being used.
    The output argument is:
    wchar_t err_buff[80]
    The text of an error message passed to Creo Parametric if the Creo TOOLKIT fails to initialize. Creo Parametric displays this text when it reports the Creo TOOLKIT failure (if user_initialize() returns non-zero).
    The first command-line argument passed to Creo TOOLKIT is the same one seen by Creo Parametric; that is, it is the name of the Creo Parametric executable. The remaining command-line arguments passed to user_initialize() are a subset of those given on the command line that invoked Creo Parametric. The rule is that Creo Parametric passes on to user_initialize() any command-line argument that starts with a “+”, or with a “-” followed by an upper-case character.
    For example, these command-line arguments will be passed to Creo TOOLKIT:
            +batch=mybatchfile.txt
            -Level=expert
    Command-line arguments such as -g:no_graphics are interpreted by Creo Parametric but not passed on to Creo TOOLKIT.
    Threading in Creo Toolkit Applications
    Calling Creo TOOLKIT applications from within multiple threads of any application in any mode is not supported. Extra threads created by the application are to be used only for completion of tasks that do not directly call the Creo TOOLKIT functions.
    Multithreading is now always supported in Creo TOOLKIT applications, without the need to call the multithreading function, when the application creates additional threads for processing.
    Using Creo Toolkit to Make a Batch Creo Parametric Session
    Function Introduced:
    If you want to use your Creo TOOLKIT application to perform operations on Creo Parametric objects that do not require interaction with the user, you can make all the necessary calls to Creo TOOLKIT functions in user_initialize(). When your operations are complete, call the function ProEngineerEnd() to terminate the Creo Parametric session.
    A useful technique when designing a batch-mode Creo TOOLKIT application is to use command-line arguments to Creo Parametric as a way of signaling the batch mode and passing in the name of a batch control file. Consider the following command to start Creo Parametric:
         pro +batch=<filename>
    In this example, the option will be ignored by Creo Parametric, but will be passed as an input argument to user_initialize(). Inside that function, your code can recognize the switch, and get the name of the file that could contain, for example, the names of Creo Parametric models to be processed, and operations to be performed on each one.
    A batch-mode operation should also run without displaying any graphics. To ensure that the Creo Parametric main Graphics Window and Message Window are not displayed, you should use either the command-line option -g:no_graphics (or the configuration file option “graphics NO_GRAPHICS”) to turn off the Creo Parametric graphics. See the Creo Parametric Help for more details of these options.
    Example 1: Batch Mode Operation
    The sample code in simple_async.c located at <creo_toolkit_loadpoint>\<version>\Common Files\protoolkit\protk_appls\pt_simple_async\pt_sasync_src shows how to use the arguments to user_initialize() and the function ProEngineerEnd() to set up a batch mode session of Creo Parametric. The application retrieves a part specified in the Creo Parametric command line, performs an action on it (using the dummy function UserAddHoles()), saves the parts, and terminates Creo Parametric.
    Creo Toolkit Support for Creo Applications
    Creo TOOLKIT applications in synchronous and asynchronous modes are supported only with the Creo Parametric application. They are not supported with the other Creo applications, such as, Creo Layout, Creo Simulate, and so on.
    In the asynchronous mode, the functions ProEngineerConnect() and ProEngineerStart() return an error when the Creo TOOLKIT application attempts to connect to a Creo application other than Creo Parametric.
    For Creo TOOLKIT applications in synchronous mode, the non-Creo Parametric applications ignore the Toolkit registry files without any warnings. The Auxiliary Applications dialog box is also not available within the non-Creo Parametric applications.
    User-Supplied Main
    Function Introduced:
    In synchronous mode, the main() function of the Creo TOOLKIT program is not written by you, the application developer. In DLL mode, the main() is the root of the Creo Parametric program itself; in multiprocess synchronous mode, the main() is taken from the Creo TOOLKIT library, and its job is to set up the communication channel with the separate Creo Parametric executable.
    If you are using a language such as C++ in your Creo TOOLKIT application, it can be advantageous to compile the main() function with the C++ compiler to ensure that the program structure is correct for C++. In DLL mode, you cannot do this because you do not have access to the Creo Parametric main(). But in multiprocess mode, you can substitute the Creo TOOLKIT main() with your own, if you observe the following rules:
    •  Your main() must call the function ProToolkitMain() as its last statement. This function contains all the necessary setup code that needs to be run when the Creo TOOLKIT application starts up in multiprocess mode.
    •  You must pass on the argc and argv arguments input to main() as the input arguments to ProToolkitMain() without modifying them in any way.
    •  You cannot make calls to any other Creo TOOLKIT functions before the call to ProToolkitMain(), because the communications with Creo Parametric have not yet been set up. You may, however, make other non-Creo TOOLKIT function calls before calling ProToolkitMain().
    The following example shows a user-defined main() for use in multiprocess mode.
    #include "ProToolkit.h"
    main(
        int argc,
        char *argv[])
    {
        .
        .
        .
        ProToolkitMain (argc, argv);
        /* The program exits from within ProToolkitMain().
           Any code here is not executed. */
    }
    Asynchronous Mode
    For more information on the asynchronous mode, see Core: Asynchronous Mode.
    Creo Toolkit Techniques
    This section describes the basic techniques you use when writing Creo TOOLKIT applications. The topics are as follows:
    Also see Visit Functions for information on techniques used when writing Creo TOOLKIT applications.
    Object Handles
    Each object in Creo TOOLKIT has a corresponding C typedef, called a “handle”, whose name is always the name of the object itself with the prefix “Pro.” The handle is used as the type for all variables and arguments that refer to an object of that type. For example, any Creo TOOLKIT function that performs an action on a solid has an input argument of type ProSolid.
    Handles are classified into two types, depending on the way in which they are defined and have to be used. The two types are opaque handle (OHandle) and database handle (DHandle). The following sections describe these handles in detail.
    OHandles
    The simplest way to reference an object in Creo Parametric is to use the memory address of the Creo Parametric data structure that describes that object. To prevent the Creo TOOLKIT application from accessing the content of the data structure for the object directly, the declaration of the structure is not provided. For example, the object handle ProSurface is defined as follows:
         typedef struct geom* ProSurface;
    The structure struct geom is used to describe a surface in Creo Parametric, but the declaration of the structure is not included in Creo TOOLKIT. This type of handle is called an opaque handle or opaque pointer for this reason.
    Opaque handles have the advantage of simplicity and efficiency—they can be directly dereferenced inside the Creo TOOLKIT function without any searching. They can also reference items that are transient and not in the Creo Parametric database at all, such as the surfaces and edges that result from an interference volume calculation.
    Other examples of Creo TOOLKIT objects that are given OHandles are as follows:
         typedef void* ProMdl;
         typedef struct curve_header* ProEdge;
         typedef struct sld_part* ProSolid;
         typedef struct entity* ProPoint;
         typedef struct entity* ProAxis;
         typedef struct entity* ProCsys;
         typedef struct entity* ProCurve;
    Because opaque handles are just memory pointers, they suffer the disadvantage of all pointers in that they are volatile—they become invalid if the database object they refer to moves to a different memory location. For example, a ProSurface handle (a pointer to a Creo Parametric surface) may become invalid after regeneration of the owning part (because its memory has been reallocated).
    However, most of the Creo Parametric structures referenced by opaque handles contain an integer identifier that is unique for items of that type within the owning model. This identifier retains its value through the whole life of that item, even between sessions of Creo Parametric. Creo TOOLKIT provides functions such as ProSurfaceIdGet() and ProAxisIdGet() that enable your application to use these identifiers as a persistent way to reference objects. These integer identifiers are also used in DHandles, described in the following section.
    In the case of models, it is the name and type that are persistent. The functions ProMdlMdlnameGet() and ProMdlTypeGet() provide the name and type of a model, given its opaque handle.
    DHandles
    A further limitation of opaque handles is that they can be too specific in cases where the action you want to perform is more generic. For example, a function that provides the name of a geometrical item should, ideally, be able to act on any of the geometry objects (ProSurface, ProEdge, ProCsys, and so on). However, the opaque handles for those different geometry items are not mutually compatible, so the Creo TOOLKIT function would also need to know the type of the object before it could internally de-reference the opaque pointer.
    To solve this problem, Creo TOOLKIT defines a new, generic object type in these cases and declares it using a data handle, or DHandle. A DHandle is an explicit data structure that carries just enough information to identify a database item uniquely: the type, integer identifier, and handle to the owning model. Because the DHandle must contain the integer identifier (not the too-specific opaque handle), it also has the advantage of being persistent.
    The most important examples of DHandles are ProGeomitem, which is the generic type for the geometry items previously mentioned, and ProModelitem, which is an even more generic object that includes ProGeomitem.
    The declaration is as follows:
         typedef struct pro_model_item
         {
            ProType  type;
            int      id;
            ProMdl   owner;
         } ProModelitem, ProGeomitem;
    Note
    Although the field owner is defined using the OHandle ProMdl, and is therefore strictly speaking volatile, this handle is guaranteed to remain valid while the Creo Parametric model it refers to remains in memory.
    The generic object ProGeomitem can represent any of the geometrical objects in a solid model, such as ProSurface, ProEdge, ProCurve, and ProCsys. The specific object types are said to be “derived from” the most generic type, and also to be “instances” of that type. The object type ProGeomitem is in turn an instance of ProModelitem, which can represent database items other than geometrical ones.
    The generic object types such as ProModelitem and ProGeomitem are used as inputs to Creo TOOLKIT functions whose actions are applicable to all of the more specific types of object that are instances of the generic type. For example, the function ProGeomitemFeatureGet() has that name because it can act on any type of object that is an instance of ProGeomitem ProSurface, ProEdge, ProCsys, and so on. The function ProModelitemNameGet() is applicable to a wider range of database objects, not just geometrical ones.
    If you have the OHandle to an object, such as ProSurface, and you want to call a generic function such as ProGeomitemFeatureGet(), you need to convert the OHandle to the more generic DHandle. Functions such as ProGeomitemInit() and ProModelitemInit() provide this capability. Similarly, you can convert a ProGeomitem to a ProSurface using the function ProSurfaceInit(). These techniques are illustrated in Example 3: Listing Holes in a Model, in the Visit Functions section.
    Workspace Handles
    When you use Creo TOOLKIT to create an object in Creo Parametric that contains a lot of information, such as a feature, it is important to be able to set up all of that information before adding the object to the Creo Parametric database. The object-oriented style of Creo TOOLKIT does not allow explicit access to the contents of such a structure, however. Instead, you must use a special workspace object that is allocated and filled by the Creo TOOLKIT application using functions provided for that purpose.
    The “workspace” is a memory area in Creo Parametric that contains data structures not yet part of the design database.
    The workspace object is identified by a handle that contains the address of the memory for the object, which is therefore similar to an OHandle. To distinguish this from handles that refer to objects in the Creo Parametric database, such handles are called workspace handles (WHandles).
    Expandable Arrays
    Functions Introduced:
    The functions in this section enable you to access a set of programming utilities in general use within Creo Parametric. The utilities fill a need that is common in C and Pascal programming—to provide a storage method that provides the advantages of an array, but without its limitations.
    When you use an array for storage for a group of items, you have the advantage over a linked list in that the members are contiguous in memory. This enables you to access a given member using its index in the array. However, if you need to make frequent additions to the members in a way that cannot be predicted (a common situation in MCAE applications), you must reallocate the memory for the array each time.
    A common compromise is to allocate the memory in blocks large enough to contain several array members, then reallocate the memory only when a block becomes full. You would choose the size of the blocks such that the frequency of reallocation is significantly reduced, while the amount of unused memory in the last block is acceptably small. The difficulty of this solution is that you would normally need a new set of utilities for each item you want to store as an array, and additional static data for each array to keep track of the number of blocks and the number of members.
    The “expandable array” utilities provide a set of functions that can be applied to items of any size. The utilities do this by keeping a private header at the start of the array memory to which the “bookkeeping” information (the number and size of its members, and of the blocks) is written. The pointer your application sees is the address of the first block, not the address of the preceding header.
    The importance of the expandable array utilities in a Creo TOOLKIT application is not only that you can use them for your own arrays, but that you must use them for arrays of data passed between your application and the internals of Creo Parametric through the Creo TOOLKIT functions.
    Note that because the array pointer is not the start of the contiguous memory claimed by the array utility, this pointer is not recognized by the operating system as a valid location for dynamic memory. Therefore, you will cause a fatal error if you try to use the memory management library functions, such as realloc() and free().
    The basic type used for referring to expandable arrays is ProArray, declared as a void*.
    The function ProArrayAlloc() sets up a new expandable array. Its inputs are as follows:
    •  The initial number of members in the array
    •  The size, in bytes, of each array member
    •  Number of objects added to ProArray at each memory reallocation. A higher number means more memory is preallocated and fewer reallocations of the ProArray are required.
    The function outputs a pointer to the contiguous memory that will contain the array members. You can write to that memory to fill the array using the usual memory functions (such as memcpy() and memset()). If you increase the array size beyond the limit returned by ProArrayMaxCountGet(), this function returns an out-of-memory message.
    The maximum memory allocated is 2 MB, except for 64–bit platforms where the maximum is twice that.
    The function ProArrayFree() releases the memory for the specified ProArray.
    The function ProArraySizeGet() tells you how many members are currently in the specified array.
    The ProArraySizeSet() function enables you to change the number of members in the expandable array. This function is equivalent to realloc().
    Function ProArrayMaxCountGet(), when given the specified structure size in bytes, returns the maximum number of structure elements a ProArray can support for that structure size.
    The function ProArrayObjectAdd() adds a contiguous set of new members to an array, though not necessarily to the end of the array. The function also sets the contents of the new members. If you increase the array size beyond the limit returned by ProArrayMaxCountGet(), this function returns an out-of-memory message.
    The function ProArrayObjectRemove() removes a member from the array. The member does not necessarily have to be the last member of the array.
    Functions ProArraySizeSet(), ProArrayObjectAdd(), and ProArrayObjectRemove() change the size of the array, and might therefore also change its location.
    The Creo TOOLKIT functions use expandable arrays in the following circumstances:
    •  The function creates a filled, expandable array as its output.
    •  The function needs a filled, expandable array as its input.
    •  The function needs an existing expandable array to which to write its output.
    An example of the first type of function is the geometry function ProEdgeVertexdataGet(), which provides a list of the edges and surfaces that meet at a specified solid vertex. When you have finished using the output, you should free the arrays of edges and surfaces (using the function ProArrayFree()).
    An example of the second type of function is ProSolidNoteCreate(), which creates a design note in a solid. Because the text lines to add to the note are passed in the form of an expandable array, your application must create and fill the array using the functions ProArrayAlloc() and ProArrayObjectAdd() before you call ProSolidNoteCreate().
    An example of the third type of function is ProElementChildrenGet(), which gets the number of feature elements that are the children of the specified compound element. The feature elements form a tree that contains all the necessary information about a particular feature. (This function is therefore used in both feature analysis and feature creation.) Before calling ProElementChildrenGet(), you must call ProArrayAlloc() to create an empty array. You can then use ProArraySizeGet() to find out how many elements were added to the array.
    There is a fourth case, which is a variation of the first, in which a Creo TOOLKIT function creates an expandable array as its output the first time it is called in an application, but overwrites the same array on subsequent calls. An example of this is ProSelect(), whose output array of ProSelection structures must not be freed using ProArrayFree(). You must also make sure to copy the contents of the array if you need to use it to make another call to ProSelect().
    The conventions are chosen for each function according to its individual needs. For example, ProElementChildrenGet() is typically called in a recursive loop to traverse a tree, so the fourth method of allocation would be inconvenient.
    The rules for each Creo TOOLKIT function are documented in the browser.
    Example 2: Expandable Arrays
    The sample code in UgFundExpArrays.c located at <creo_toolkit_loadpoint>\protk_appls\pt_userguide\ptu_fundament shows how to use expandable arrays, not as input or output for a Creo TOOLKIT function, but to create a utility that provides an alternative to a Creo TOOLKIT visit function. To use Creo TOOLKIT to access all the features in a solid, you call the function ProSolidFeatVisit(). However, you might prefer to use a function that provides an array of handles to all of the features, then traverse this array. This kind of function is called a “collection” function, to distinguish it from a visit function. Although Creo TOOLKIT does not provide collection functions, you can use the technique demonstrated in the example to write your own.
    The utility function UserFeatureCollect() passes an empty, expandable array of feature handles as the application data to ProSolidFeatVisit(). The visit function FeatVisitAction() adds the handle to the visited feature to the array using ProArrayObjectAdd().
    Visit Functions
    In a Creo TOOLKIT application, you often want to perform an operation on all the objects that belong to another object, such as all the features in a part, or all the surfaces in a feature. For each case, Creo TOOLKIT provides an appropriate “visit function.” A visit function is an alternative to passing back an array of data.
    You write a function that you want to be called for each item (referred to as the “visit action” function) and pass its pointer to the Creo TOOLKIT visit function. The visit function then calls your visit action function once for each visited item.
    Most visit functions also provide for a second callback function, the filter function, which is called for each visited item before the action function. The return value of the filter function controls whether the action function is called. You can use the filter function as a way of visiting only a particular subset of the items in the list.
    For example, the visit function for visiting the features in a solid is declared as follows:
         ProError ProSolidFeatVisit (
           ProSolid                 solid,
           ProFeatureVisitAction    visit_action,
           ProFeatureFilterAction   filter_action,
           ProAppData               app_data);
    The first argument is the handle to the solid (the part or assembly) whose features you want to visit.
    The second and third arguments are the visit action function and filter function, respectively.
    The type of the final argument, ProAppData, is a typedef to a void*. This argument is used to pass any type of user-defined application data down to the visit_action and filter_action functions through the intervening Creo TOOLKIT layer. You might want to use this as an alternative to allowing global access to the necessary data.
    Although you write the visit action and filter functions, they are called from within the Creo TOOLKIT visit function, so their arguments are defined by Creo TOOLKIT. To enable the C compiler to check the arguments, Creo TOOLKIT provides a typedef for each of these functions.
    For example, the type for the action function for ProSolidFeatVisit() is as follows:
         typedef ProError (*ProFeatureVisitAction)(
           ProFeature  *feature,
           ProError     status,
           ProAppData   app_data);
    It takes three arguments:
    •  The handle to the feature being visited
    •  The status returned by the preceding call to the filter function
    •  The application data passed as input to the visit function itself
    The type for the filter function is as follows:
         typedef ProError (*ProFeatureFilterAction)(
           ProFeature   *feature,
           ProAppData    app_data);
    Its two arguments are the handle to the feature being visited and the application data.
    The filter action function should return one of the following values:
    •  PRO_TK_CONTINUE—Do not call the visit action for this object, but continue to visit the subsequent objects.
    •  Any other value—Call the visit action function for this object and pass the return value as the status input argument.
    The visit action function should return one of the following values:
    •  PRO_TK_NO_ERROR—Continue visiting the other objects in the list.
    •  PRO_TK_E_NOT_FOUND—For visit functions, this value indicates that no items of the desired type were found and no functions could be visited.
    •  Any other value (including PRO_TK_CONTINUE)—Terminate the visits. Typically this status is returned from the visit function upon termination, so that the calling function knows the reason that visiting terminated abnormally.
    Example 3: Listing Holes in a Model
    The sample code in UgFundVisit.c located at <creo_toolkit_loadpoint>\protk_appls\pt_userguide\ptu_fundament demonstrates several of the principles used in Creo TOOLKIT, including visit functions, the use of Ohandles and Dhandles, and the ProSelection object.
    The example shows the function UserDemoHoleList(), which visits the axes in the current part that belong to features of type HOLE. It then writes the axis names and feature identifiers to a file, and highlights the hole features.
    The top function, UserDemoHoleList(), calls ProSolidAxisVisit(). The function uses the ProAppData argument to pass to the visit action function, UserDemoAxisAct(), a structure that contains the file pointer and handle to the owning solid.
    Support for Creo Model Names and Files Paths
    Creo Parametric supports a maximum length of 31 characters for file names of native Creo models. This excludes the file extension. The local file paths can contain a maximum of 260 characters. File paths support some multi-byte characters.
    From Creo Parametric 4.0 F000 onward, file names support multi-byte characters.
    The file names and file paths support the following multi-byte characters:
    •  All characters from Unicode number 0800 onward.
    •  The following characters from Unicode numbers 0000 to 0070F are supported. All the other Unicode characters between 0000 to 0070F are not supported.
      A to Z
      a to z
      0 to 9
      _ Underscore
      – Hyphen
    All the Creo TOOLKIT functions support multi-byte characters in file names and file paths of the models.
    Wide Strings
    Creo TOOLKIT, like Creo Parametric, has to work in environments where character strings use codes other than ASCII, and might use a bigger character set than can be coded into the usual 1-byte char type, for example, the Japanese KANJI character set.
    For this reason, Creo TOOLKIT uses the type wchar_t instead of char for all characters and strings that may be visible to the Creo Parametric user. This includes all text messages, keyboard input, file names, and names of all dimensions, parameters, and so on, used within a Creo Parametric object.
    Defining wchar_t
    Although most platforms supported by Creo TOOLKIT provide a definition of wchar_t in a system include file, not all do. Those that do use definitions of different lengths; some provide definitions that are not suitable for all the character codes supported by Creo Parametric. Therefore, Creo Parametric takes considerable care to make sure it uses a suitable definition of wchar_t on each supported platform.
    It is essential to make sure your Creo TOOLKIT application is using the same definition of wchar_t as Creo Parametric on each platform your application supports. To make this easier, Creo TOOLKIT supplies the include filepro_wchar_t.h. This file ensures that, if a definition of wchar_t.h has not already been made in an earlier include file, one is provided that is consistent with the Creo Parametric definition of the type. Because this file is included by the file ProToolkit.h, you should include ProToolkit.h as the very first include file in each source file.
    Setting the Hardware Type
    To make the handling of the wide character type wchar_t across different platforms simpler and more reliable, the include file pro_wchar_t.h is hardware dependent. It knows which platform is being used from the setting of the environment variable PRO_MACHINE; the recognized values are listed in the include file pro_hardware.h, included by pro_wchar_t.h.
    You must make sure that the environment variable PRO_MACHINE is set to indicate the type of hardware you are using. Set it to same value used for the makefile macro PRO_MACHINE in the makefile taken from the Creo TOOLKIT loadpoint.
    Checking Your Declaration of wchar_t
    Function Introduced:
    The function ProWcharSizeVerify() checks to make sure you have the correct declaration of wchar_t. PTC recommends that you always call this function at the beginning of the user_initialize() function (or main() in asynchronous mode).
    You pass as input the size of your wchar_t definition, in bytes, and the function outputs the correct size. It returns PRO_TK_NO_ERROR if your size is correct, and PRO_TK_GENERAL_ERROR otherwise. You can check for correctness as follows:
              int proe_wchar_size;
              int protk_wchar_size = sizeof (wchar_t);
    
              if (ProWcharSizeVerify (protk_wchar_size, &proe_wchar_size) !=
                  PRO_TK_NO_ERROR)
              {
                  ProMessageDisplay (msgfil, "USER wchar_t size is %0d,
                       should be %1d", &protk_wchar_size, &proe_wchar_size);
                  return (1);
              }
    String and Widestring Functions
    Creo Parametric provides many functions taking as inputs a fixed-length character or wide character array as a string. Due to some platform-specific behavior, PTC recommends that you do not use string literals in lieu of fixed length arrays. Always copy the literal strings to the full size array that the functions accepts as the input.
    For example the following function will get warnings on certain platforms because the code expects that the arguments can be modified.
    ProEngineerStart("proe_path","text_path");
    where ProCharPath proe_path=”proe_path”;
    ProCharPath text_path=”text_path”;
    To overcome this error, it is recommended that you replace the literal strings in the function with defined arrays as follows:
    ProEngineerStart(proe_path,text_path);
    Functions Introduced:
    Wide character strings are not as easy to manipulate in C as ordinary character strings. In general, there are no functions for wide strings that correspond to the standard C str*() functions. printf() does not have a format for wide strings, and you cannot set a wide string to a literal value in a simple assignment. Because of this, it is frequently convenient to convert wide strings to character strings, and vice versa. This is the purpose of the functions ProStringToWstring() and ProWstringToString().
    The function ProWstringLengthGet() is used to find the length of a widestring.
    The function ProWstringCopy() copies a widestring into another buffer. You should allocate enough memory in the target setting to perform the copy operation. The number of characters to be copied is provided as input through num_chars. Use PRO_VALUE_UNUSED to copy the entire string.
    The function ProWstringCompare() compares two widestrings for equality. The two widestrings to be compared are given as inputs. The argument num_chars allows comparison of portions of the string, pass PRO_VALUE_UNUSED to compare the entire strings.
    The function ProWstringConcatenate() concatenates two widestrings. You should allocate enough memory in the target string for the copy operation. The number of characters to concatenate is given as input through num_chars. Use PRO_VALUE_UNSED to add the entire source string to the target string.
    The source code for other useful utilities is located in the file <TK_LOADPOINT>protk_appls\pt_examples\pt_utils\UtilString.c
    Example 4: String Conversion
    The sample code in UgFundStringConv.c located at <creo_toolkit_loadpoint>\protk_appls\pt_userguide\ptu_fundament uses the function UsrModelFilenameGet() to convert wide strings to character strings.
    Support for IPv6
    Creo 6.0.0.0 and later releases have complete support for Internet Protocol version 6 (IPv6). By default Creo uses IPv6 for IP addressing over the network.
    Set the environment variable PTC_IPV6_MODE to yes for Creo to use the IPv6 protocol for addressing. To use IPv4 communication protocol, set the environment variable to no.
    If you want to run applications created in Creo Parametric 5.0.0.0 and previous releases in Creo Parametric 6.0.0.0 with IPv6 enabled, you must rebuild the applications.
    If the environment variable is set to no, that is for IPv4 protocol, these applications continue to work in Creo Parametric 6.0.0.0 without rebuilding.
    Accessing LearningConnector
    Function Introduced:
    LearningConnector (LC) is a feature in Creo that allows users to access the Creo training directly from a Creo application. An event triggered in the Creo user interface notifies the LearningConnector, which displays the relevant training topics for the current activity.
    The function ProLearningconnectorNotify() notifies the LearningConnector that an event has been triggered from a Creo TOOLKIT application. The function also allows users to notify custom-made trainings other than the standard training provided by PTC for the specified module. The LearningConnector displays the relevant training topics for the specified input arguments. You must read the LearningConnector documentation before using this function. The input arguments are:
    •  module—This is a mandatory argument. Specifies the name of the Creo module that triggers the event.
    •  module_info—This is an optional argument. Specifies additional information about the Creo module that triggers the event. This additional information is used by the event-handling function of LearningConnector.
    You can use the function on customized Creo TOOLKIT widgets also.