User Interface: Ribbon Tabs, Groups, and Menu Items
This section describes theCreo TOOLKIT support for the Ribbon User Interface (UI). It also describes the impact of the ribbon user interface on legacy Pro/TOOLKIT applications and the procedure to place the commands, buttons, and menu items created by the legacy applications in the Creo Parametric ribbon user interface. Refer to the Creo Parametric Help for more information on the ribbon user interface and the procedure to customize the ribbon.
Creating Ribbon Tabs, Groups, and Menu Items
Customizations to the ribbon user interface using the Creo TOOLKIT applications are supported through the Customize Ribbon tab in the Creo Parametric Options dialog box. You can specify the user interface layout for a Creo TOOLKIT application and save the layout definition in a ribbon definition file, toolkitribbonui.rbn. When you run Creo Parametric, the toolkitribbonui.rbn file is loaded along with the Creo TOOLKIT application and the commands created by the Creo TOOLKIT application appear in the ribbon user interface. Refer to the section About the Ribbon Definition Filefor more information on the toolkitribbonui.rbn file.
You can customize the ribbon user interface only for a particular mode in Creo Parametric. For example, if you customize the ribbon user interface and save it to the toolkitribbonui.rbn file in the Part mode, then on loading Creo Parametric the customized user interface will be visible only in the Part mode. To view a particular tab or group in all the modes, you must customize the ribbon user interface and save the toolkitribbonui.rbn file in each mode. Refer to the Creo Parametric help for more information on customizing the ribbon.
Note
You can add a new group to an existing tab or create a new tab using the Customize Ribbon tab in the Creo Parametric Options dialog box. You will not be able to modify the tabs or groups that are defined by Creo Parametric.
Workflow to Add Menu Items to the Ribbon User Interface
Note
The instructions explained below are applicable only if the application is implemented in full asynchronous mode. This is because applications in simple asynchronous mode cannot handle requests, that is, command callbacks, from Creo Parametric. Refer to the chapter Core: Asynchronous Mode, for more information.
You must have a Creo TOOLKIT development license to customize the ribbon user interface for Creo TOOLKIT applications. The steps to add commands to the Creo Parametric ribbon user interface are as follows:
1. Create a Creo TOOLKIT application with complete command definition, which includes specifying command label, help text, large icon name, and small icon name. Designate the command using the ProCmdDesignate().
Note
The labels and the text added using the ProCmdDesignate() function duplicate existing messages that are previously added in the Creo database. To display the correct label and text message, you can use a prefix or a suffix with the message names that will identify your Creo TOOLKIT application. You should avoid using generic names of Creo TOOLKIT buttons such as Point, Arc, Circle, Ellipse in the labels and text.
2. Start the Creo TOOLKIT application and ensure that it is started or connected to Creo Parametric. The commands created by the Creo TOOLKIT application will be loaded in Creo Parametric.
3. Click File  Options. The Creo Parametric Options dialog box opens.
4. Click Customize Ribbon.
5. In the Customize the Ribbon list, select a tab and create a new group in it or create a new tab and a group in it.
6. In the Choose commands from list, select TOOLKIT Commands. The commands created by the Creo TOOLKIT application are displayed.
7. Click Add to add the commands to the new tab or group.
8. Click Import/Export  Save the Auxiliary Application User Interface. The changes are saved to the toolkitribbonui.rbn file. The toolkitribbonui.rbn file is saved in the text folder specified in the Creo TOOLKIT application registry file. For more information refer to the section on Ribbon Definition File.
9. Click Apply. The custom settings are saved to the toolkitribbonui.rbn file.
10. Reload the Creo TOOLKIT application or restart Creo Parametric. The toolkitribbonui.rbn file will be loaded along with the Creo TOOLKIT application.
If translated messages are available for the newly added tabs or groups, then Creo Parametric displays the translated strings by searching for the same string from the list of string based messages that are loaded. For more information refer to the section on Localizing the Ribbon User Interface Created by the Creo Parametric TOOLKIT Applications.
About the Ribbon Definition File
A ribbon definition file is a file that is created through the Customize Ribbon interface in Creo Parametric. This file defines the containers, that is, Tabs, Groups, or Cascade menus that are created by a particular Creo TOOLKIT application. It contains information on whether to show an icon or label. It also contains the size of the icon to be used, that is, a large icon (32X32) or a small icon (16x16).
The ribbon user interface displays the commands referenced in the ribbon definition file only if the commands are loaded and are visible in that particular Creo Parametric mode. If translated messages are available for the newly added tabs or groups, then Creo Parametric displays the translated strings by searching for the same string from the list of string based messages that are loaded. For more information refer to the section on Localizing the Ribbon User Interface Created by the Creo Parametric TOOLKIT Applications.
You need a Creo Parametric development license to create, modify, or save the toolkitribbonui.rbn file. You cannot edit it manually. To save the ribbon user interface layout definition to the toolkitribbonui.rbn file:
1. Click File  Options. The Creo Parametric Options dialog box opens.
2. Click Customize Ribbon.
3. In the Customize the Ribbon list, select a tab and create a new group in it or create a new tab and a group in it.
4. In the Choose commands from list, select TOOLKIT Commands. The commands created by the Creo TOOLKIT application are displayed.
5. Click Add to add the commands to the new tab or group.
6. Click Import/Export  Save the Auxiliary Application User Interface. The modified layout is saved to the toolkitribbonui.rbn file located in the text folder within the Creo TOOLKIT application directory, that is, <protk_app_dir>/text
7. Click OK.
To Specify the Path for the Ribbon Definition File
You can rename the toolkitribbonui.rbn to another filename with the .rbn extension. To enable the Creo TOOLKIT application to read the ribbon definition file having a name other than toolkitribbonui.rbn, it must be available at the location <protk_app_dir>/text/ribbon. The function introduced in this section enables you to load the ribbon definition file from within a Creo TOOLKIT application.
Function Introduced:
The function ProRibbonDefinitionfileLoad() loads a specified ribbon definition file from a default path into the Creo Parametric application. The input argument is as follows:
•  file_name - Specify the name of the ribbon definition file including its extension. The default search path for this file is:
  The working directory from where Creo Parametric is loaded.
  <application_text_dir>/ribbon
  <application_text_dir>/language/ribbon
Note
  The location of the application text directory is specified in the Creo TOOLKIT registry file.
  A Creo TOOLKIT application can load a ribbon definition file only once. After the application has loaded the ribbon, calls made to the function ProRibbonDefinitionfileLoad() to load other ribbon definition files are ignored.
Loading Multiple Applications Using the Ribbon Definition File
Creo Parametric supports loading of multiple .rbn files in the same session. You can develop multiple Creo TOOLKIT applications that share the same tabs or groups and each application will have its own ribbon definition file. As each application is loaded, its .rbn file will be read and applied. When an application is unloaded, the containers and command created by its .rbn file will be removed.
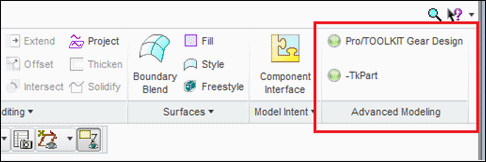
For example, consider two Creo TOOLKIT applications, namely, pt_geardesign and pt_examples that add commands to the same group on a tab on the Ribbon user interface. The application pt_geardesign adds a command Pro/TOOLKIT Gear Design to the Advanced Modeling group on the Model tab and the application pt_examples adds a command TKPart to the Advanced Modeling group on the Model tab. The ribbon definition file for each application will contain an instruction to create the Advanced Modeling group and if both the ribbon files are loaded, the group will be created only once and the two ribbon customizations will be merged into the same group.
That is, if both the applications are running in the same Creo Parametric session, then the commands, Pro/TOOLKIT Gear Design and TKPart will be available under the Advanced Modeling group on the Model tab.
Note
The order in which the commands will be displayed within the group will depend on the order of loading of the .rbn file for each application.
The following image displays commands added by two Creo TOOLKIT applications to the same group.
Image
To save the customization when multiple applications are loaded:
1. Click File  Options. The Creo Parametric Options dialog box opens.
2. Click Customize Ribbon.
3. In the Customize the Ribbon list, select a tab and create a new group in it or create a new tab and a group in it.
4. In the Choose commands from list, select TOOLKIT Commands. The commands created by the TOOLKIT application are displayed.
5. Click Add to add the commands to the new tab or group.
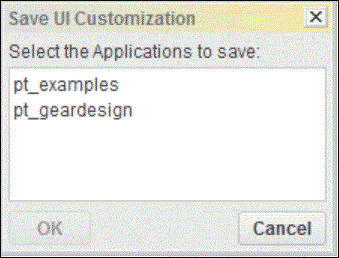
6. Click Import/Export  Save the Auxiliary Application User Interface. The Save UI Customization dialog box opens.
7. Select a Creo TOOLKIT application and Click Save. The modified layout is saved to the .rbn file of the specified Creo TOOLKIT application.
The Save UI Customization dialog box is shown in the following image:
Image
Localizing the Ribbon User Interface Created by Creo Toolkit Applications
The labels for the custom tabs, groups, and cascade menus belonging to the Creo TOOLKIT application can be translated in the languages supported by Creo Parametric. To display localized labels, specify the translated labels in the ribbonui.txt file and save this file at the location <application_text_dir>/<language>. For example, the text file for German locale must be saved at the location <application_text_dir>/german/ribbonui.txt.
Create a file containing translations for each of the languages in which the Creo TOOLKIT application is localized. The Localized translation files must use the UTF-8 encoding with BOM character for the translated text to be displayed correctly in the user interface. For more information on UTF-8 encoding, refer to Unicode Encoding.
The format of the ribbonui.txt file is as shown below. Specify the following lines for each label entry in the file:
1. A hash sign (#) followed by the label, as specified in the ribbon definition file.
2. The label as specified in the ribbon definition file and as displayed in the ribbon user interface.
3. The translated label.
4. Add an empty line at the end of each label entry in the file.
For example, if the Creo TOOLKIT application creates a tab with the name TK_TAB having a group with the name TK_GROUP, then the translated file will contain the following:
#TK_TAB
TK_TAB
<translation for TK_TAB>
<Empty_line>
#TK_GROUP
TK_GROUP
<translation for TK_GROUP>
<Empty_line>
Tab Switching Events
If tab switching happens at run-time in Creo Parametric, use the notification functions to trigger a call back function to manage the changes due to the tab switching.
Functions Introduced:
Use the function ProNotificationSet() to assign a callback function to be called when the application switches from one tab to the other.
If the notification argument type is set to PRO_RIBBON_TAB_SWITCH, a registered call back function whose signature matches ProRibbonTabSwitchAction() is called. The “(Switch) from Tab” and “(Switch) to Tab” information is provided to the call back function, through the function arguments, whenever a Tab switch happens.
Use the function ProNotificationUnset() to cancel a notification.
For more information on using notifications see the chapter Event-driven Programming: Notifications.
Support for Legacy Pro/TOOLKIT Applications
The user interface for Creo Parametric 1.0 has been restructured to a ribbon user interface. This may affect the behavior of existing Pro/TOOLKIT applications that were designed to add commands to specific Pro/ENGINEER menus or toolbars. These menus or toolbars or both have been redesigned in Creo Parametric 1.0. The commands added by the Pro/TOOLKIT applications appear on the Creo Parametric ribbon in the Home tab under the TOOLKIT group. When you open a model, the TOOLKIT group is on the Tools tab.
You can also arrange the commands added by the Pro/TOOLKIT applications under a new tab or an existing tab by customizing the ribbon using the Customize Ribbon tab in the Creo Parametric Options dialog box. For a list of all the commands added by the Pro/TOOLKIT applications, follow this procedure:
1. Click File  Options. The Creo Parametric Options dialog box opens.
2. Click Customize Ribbon.
3. In the Choose commands from list, select TOOLKIT Commands. All the commands added by legacy Pro/TOOLKIT applications are listed.
Note
Commands that have not been designated will not have an icon or will have a generic icon.
Refer to the Creo Parametric Help for more information on customizing the Ribbon.
Migration of Legacy Pro/TOOLKIT Applications
To migrate existing Pro/TOOLKIT applications to the Creo Parametric Ribbon user interface without compiling the source code:
1. Load the Pro/TOOLKIT applications in Creo Parametric so that the commands created in these applications are available in the Customize Ribbon user interface.
2. Modify the ribbon user interface layout and save the changes to the toolkitribbonui.rbn.
3. Copy the toolkitribbonui.rbn to the location <application_text_dir>/ribbon.
4. Reload Pro/TOOLKIT application or restart Creo Parametric. The .rbn file will be loaded along with the Pro/TOOLKIT application and the commands will be visible in the ribbon user interface if its accessibility will be visible.